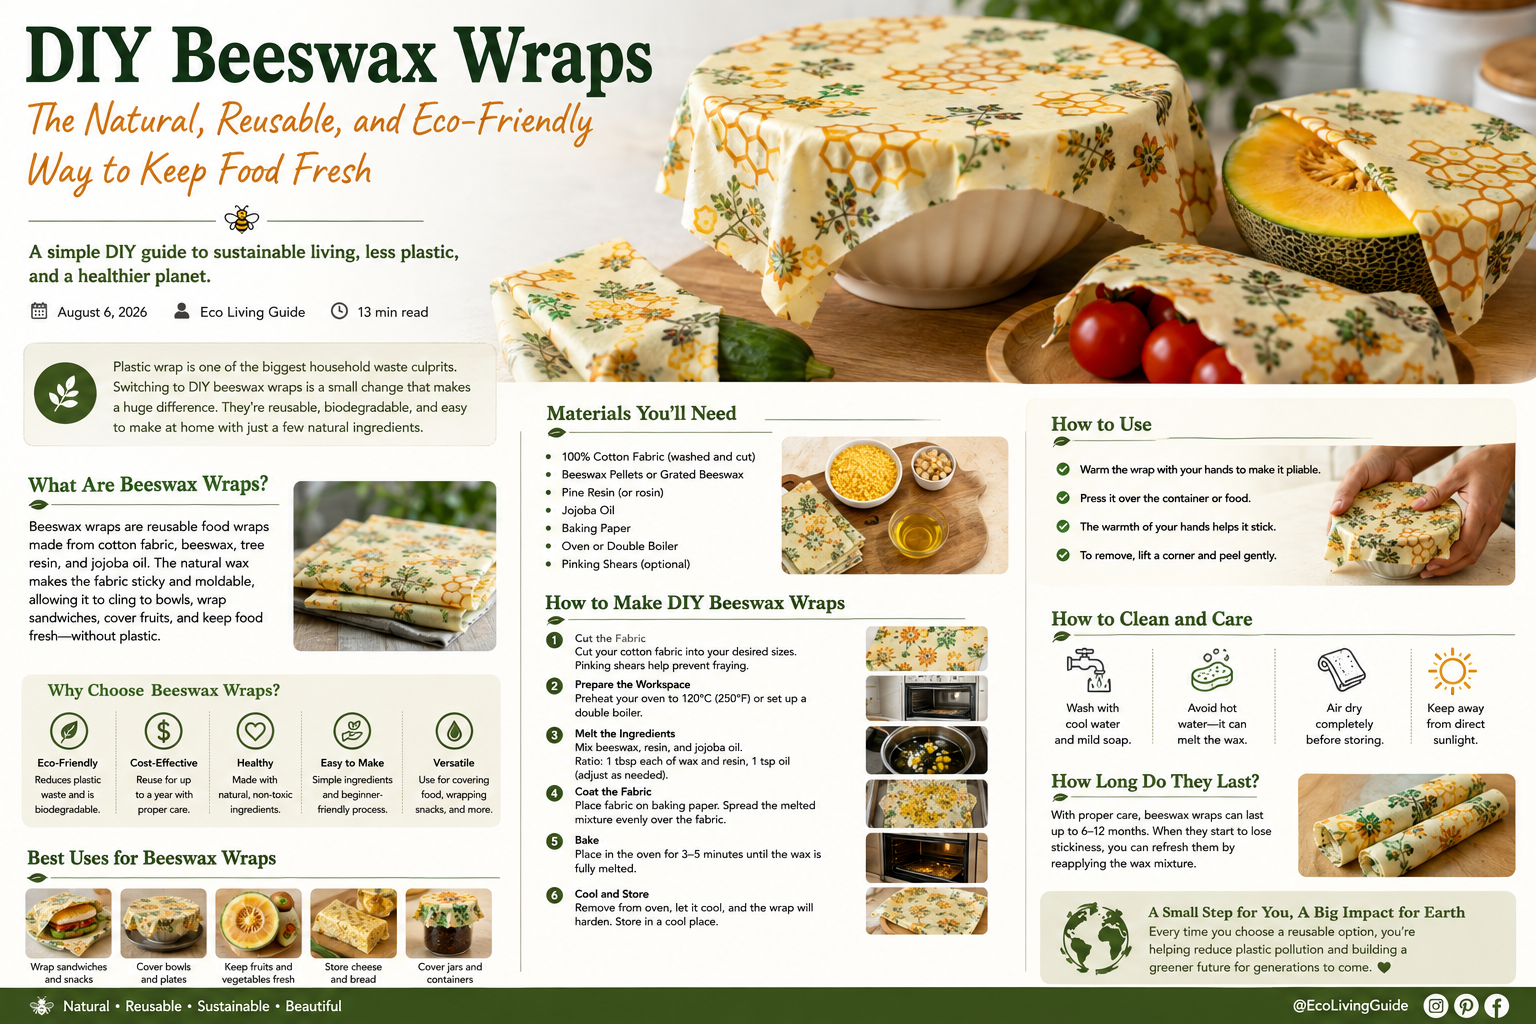
DIY Beeswax Wraps: A Complete Guide to Sustainable Food Storage
Plastic wrap has been a kitchen staple for decades, but it creates unnecessary waste and contributes to environmental pollution. If you’re looking for a simple, affordable, and eco-friendly alternative, DIY beeswax wraps are the perfect solution. These reusable food wraps are easy to make at home using natural ingredients and can replace single-use plastic wrap in most everyday situations.
Not only are beeswax wraps better for the environment, but they also help keep food fresh while reducing household waste. Whether you’re a beginner or an experienced DIY enthusiast, this guide will teach you everything you need to know about making, using, and caring for homemade beeswax wraps.
What Are DIY Beeswax Wraps?
DIY beeswax wraps are reusable food wraps made by coating cotton fabric with a mixture of beeswax, pine resin, and jojoba oil. The wax coating makes the fabric flexible, slightly sticky, and water-resistant, allowing it to cling around bowls, plates, sandwiches, fruits, vegetables, and other foods.
Unlike plastic wrap, beeswax wraps are biodegradable, reusable, and made from natural ingredients.
Why Choose Beeswax Wraps?
Switching to beeswax wraps offers many advantages for both your home and the environment.
Eco-Friendly
Every reusable wrap replaces hundreds of plastic wraps over its lifetime, helping reduce landfill waste and plastic pollution.
Reusable
With proper care, a beeswax wrap can last up to a year or more before needing a refresh.
Cost-Effective
Although making beeswax wraps requires an initial investment in materials, you’ll save money by avoiding disposable plastic wrap.
Natural Materials
Homemade wraps contain no harmful plastics and are made with natural ingredients, making them a healthier option for food storage.
Attractive Designs
Choose colorful cotton fabrics to create wraps that look beautiful in your kitchen.
Materials You’ll Need
To make DIY beeswax wraps, gather the following supplies:
- 100% cotton fabric (washed and dried)
- Natural beeswax pellets or grated beeswax
- Pine resin (optional but recommended for extra stickiness)
- Jojoba oil
- Baking paper or parchment paper
- Paintbrush (optional)
- Baking tray
- Oven or iron
- Scissors
- Measuring spoon
Choosing the Right Fabric
The best fabric for beeswax wraps is:
- 100% cotton
- Lightweight
- Tightly woven
- Pre-washed
- Bright or patterned
Avoid synthetic fabrics because the wax will not adhere properly.
DIY Beeswax Wrap Recipe
A popular recipe includes:
- 1 tablespoon beeswax pellets
- 1 tablespoon pine resin
- 1 teaspoon jojoba oil
Mix the ingredients until evenly combined.
How to Make DIY Beeswax Wraps
Step 1: Cut the Fabric
Cut cotton into your desired sizes.
Common sizes include:
- Small (8 × 8 inches)
- Medium (10 × 10 inches)
- Large (13 × 14 inches)
Pinking shears help prevent fraying.
Step 2: Prepare the Baking Tray
Place baking paper on a tray and lay the fabric flat.
Step 3: Add the Wax Mixture
Sprinkle beeswax evenly across the fabric.
Add pine resin and jojoba oil over the top.
Step 4: Melt in the Oven
Heat your oven to 120°C (250°F).
Bake for about 4–6 minutes until the wax melts completely.
Step 5: Spread the Wax
Using a brush, spread the melted wax evenly across the entire fabric.
Ensure every corner is coated.
Step 6: Dry the Wrap
Carefully lift the fabric using tongs.
Wave it gently in the air for about 30–60 seconds until it hardens.
Your beeswax wrap is now ready to use.
Alternative Iron Method
If you don’t want to use an oven:
- Place fabric between two sheets of parchment paper.
- Sprinkle wax mixture evenly.
- Cover with another sheet.
- Iron on medium heat.
- Spread the melted wax.
- Allow to cool.
This method works well for small batches.
How to Use Beeswax Wraps
Use your wraps to cover:
- Bowls
- Plates
- Sandwiches
- Cheese
- Bread
- Fruits
- Vegetables
- Snacks
- Herbs
Warm the wrap with your hands to soften the wax. Press it gently around the food or container, and it will hold its shape as it cools.
What Not to Wrap
Avoid using beeswax wraps with:
- Raw meat
- Raw fish
- Very hot foods
- Microwave cooking
- Oven baking
The heat can melt the wax, and raw meat may cause contamination.
Cleaning and Care
To keep your wraps in excellent condition:
- Wash with cool water
- Use mild dish soap
- Air dry completely
- Store in a cool place
- Avoid hot water
- Keep away from direct sunlight
Never place beeswax wraps in the dishwasher.
How Long Do Beeswax Wraps Last?
With regular use and proper care, beeswax wraps typically last 6–12 months. If they begin to lose their stickiness, you can refresh them by adding another thin layer of the wax mixture and reheating them.
Benefits of DIY Beeswax Wraps
- Reduce plastic waste
- Save money over time
- Keep food fresh naturally
- Reusable hundreds of times
- Easy to clean
- Made with natural ingredients
- Biodegradable
- Customizable with your favorite fabrics
- Great for gifts
- Simple DIY project for beginners
Common Mistakes to Avoid
- Using synthetic fabric
- Applying too much wax
- Washing with hot water
- Wrapping hot food
- Storing while damp
- Using on raw meat or fish
Avoiding these mistakes will help your wraps last longer.
DIY vs. Store-Bought Beeswax Wraps
| Feature | DIY Beeswax Wraps | Store-Bought Wraps |
|---|---|---|
| Cost | Lower over time | Higher |
| Customization | High | Limited |
| Eco-Friendly | Yes | Yes |
| Reusable | Yes | Yes |
| Beginner-Friendly | Yes | Yes |
| Fabric Choice | Unlimited | Limited |
Frequently Asked Questions
Are beeswax wraps safe for food?
Yes. They are food-safe when made with natural beeswax and clean cotton fabric.
Can I refrigerate food with beeswax wraps?
Yes. They work well in the refrigerator but should not be used in the freezer for extended periods.
Can I wash them with soap?
Yes. Use mild soap and cool water only.
Can I microwave beeswax wraps?
No. Heat will melt the wax coating.
Can I reuse them?
Absolutely. With proper care, they can be reused hundreds of times.
Final Thoughts
Reusable produce bags are one of the easiest and most effective swaps for anyone looking to reduce single-use plastic. They are durable, washable, versatile, and perfect for grocery shopping, food storage, and home organization. By making this simple change, you can help reduce plastic pollution while enjoying a practical and long-lasting solution for carrying fresh produce.
DIY Beeswax Wraps are reusable food wraps that help reduce plastic waste. Learn how to make DIY Beeswax Wraps at home with this easy step-by-step guide.